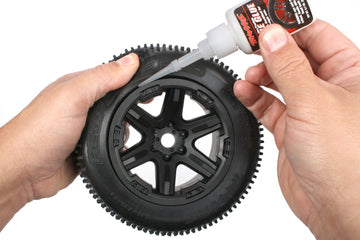
When building or maintaining your RC car, one essential skill is properly mounting and gluing the tires. A well-glued tire ensures optimal performance, better control, and durability during rough use. Here’s a step-by-step guide to help you mount and glue your RC tires.
Materials You'll Need:
- RC Tires and Wheels
- Tire Inserts (if necessary)
- High-quality tire glue (like CA glue)
- Tape or rubber bands
- Paper towels or napkins
- Cleaning solution (rubbing alcohol)
Step-by-Step Guide:
1. Prepare Your Workspace
- Begin by setting up a clean and well-lit area. Working on a clean surface ensures that no dirt or debris will get onto your tires or inside the wheel rim.
- Have all your materials and tools within reach for a smooth, uninterrupted process.
2. Inspect and Clean the Tires & Wheels
- Check the tires and wheels for any imperfections or mold-release residue.
- Use rubbing alcohol to clean both the inside of the tires and the edges of the rims. This will ensure that the glue adheres properly and creates a strong bond.
3. Install the Tire Inserts
- If your tires require foam or rubber inserts, now is the time to install them. Make sure the inserts are positioned evenly within the tire for balanced handling during driving.
- Massage the tire to make sure the insert is seated evenly without twists or lumps.
4. Fit the Tire to the Wheel
- Place the tire over the wheel rim, ensuring the beads (edges of the tire) fit snugly into the channel of the rim. The fit should be tight and even all the way around.
- Adjust the tire so that the bead is evenly positioned.
5. Gluing the Tires
- Use high-quality tire glue designed specifically for RC tires, such as CA glue. Start by pulling back the tire bead from the rim slightly.
- Apply a small amount of glue along the channel where the tire meets the rim. Use sparingly to avoid overflow, as too much glue can weaken the bond and make a mess.
- After applying the glue, press the tire back onto the rim, making sure it seats securely.
6. Use Rubber Bands to Hold the Tire in Place
- While the glue is drying, use rubber bands or tire bands to hold the tire firmly in place on the rim. This ensures the bead stays seated and the glue dries evenly.
- Allow the glue to dry according to the manufacturer’s instructions. Typically, this takes a few minutes, but some glues may require a longer curing time.
7. Repeat for All Tires
- Once the first tire is securely glued and dried, repeat the process for the other tires. Take your time to ensure each one is mounted and glued properly.
8. Check for Secure Bond
- Once all tires are glued and the glue has fully dried, inspect them for any gaps or loose areas. You can add a small amount of glue to any spots that seem loose.
Additional Tips:
- Use tire bands to apply uniform pressure while the glue dries, ensuring the tire stays perfectly in place.
- Choose the right glue: Opt for thin CA glue, which seeps into the bead and creates a strong bond quickly.
Maintenance and Care
- After several runs, inspect the tires to ensure they are still glued securely. Reapply glue to any loose areas to maintain performance.
By following this guide, your RC tires will stay securely mounted and perform optimally in all conditions. Well-glued tires ensure not only better handling and speed but also a longer lifespan of your RC vehicle's wheels.


